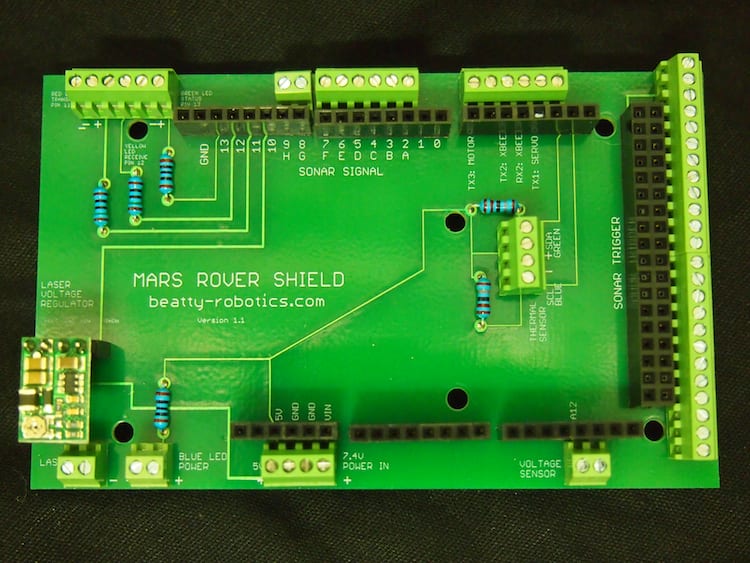
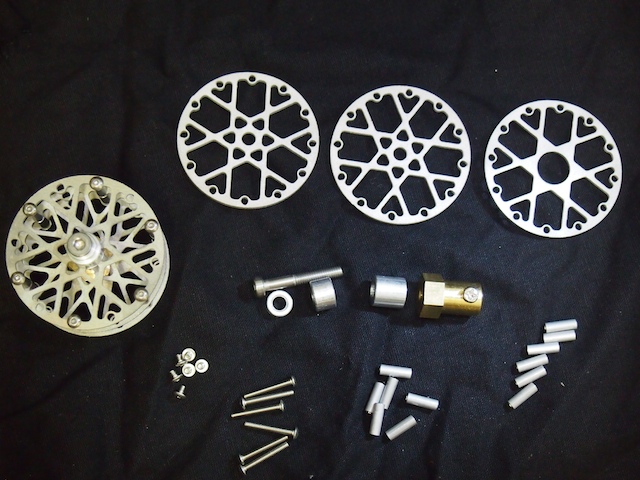
Recently, we were asked to build a second Mars Rover for the New York Hall of Science. The idea is to have a backup for the first one, and also to have a rover that can be taken off site for demonstrations. The new robot is purposefully very similar to the first one, but we couldn’t help making a few improvements along the way. We designed our very first custom circuit board, which we call the Mars Rover Shield. The shield fits into the header pins on top of the Arduino Mega. The shield’s purpose is to encapsulate the complexity of wires, resistors, screw terminals and other elements. After completing the design using Eagle software, we uploaded it to Sunstone.com and had them make the blank board for us. When the blank board arrived, my sister Genevieve soldered all the components into place. There were 165 solder points in all, but she’s quick and accurate! She did it in a matter of minutes! To our amazement, it works perfectly. Here is the finished product. Thinking about what it’s going to do for our robot, we think it’s a thing of marvelous beauty!
Over the years, we’ve used a lot of different parts to build robots. Lately we’ve been using more and more parts from the new Actobotics product line, which we buy from sites like ServoCity.com and RobotShop.com and Sparkfun.com. A short time ago, the Actobotics team approached us about sponsoring our next build. They asked us to design and construct our next robot entirely out of their parts. When we asked about the project requirements, they said, “Use your imagination. Build whatever your want.” We were delighted to accept their offer. They sent us a box of Actobotics parts and we started exploring what we could do.
We were really impressed by the quality of the machined aluminum parts and the powerful flexibility of their modular, interchangeable design. The parts use two overlapping hole patterns and standardized dimensions so that you can build a lot of different things in a lot of different ways. We soon realized that we could make a dozen different kinds of robots with these parts. But eventually, we came up with a super cool, multi-use 6WD rover. We equipped it with a pan-tilt camera turret with changeable mounts for a Wifi Camera, GoPro Camera, or HackHD FPV camera. This platform would also make a great gun turret for an Airsoft pellet gun or a paintball gun. We were on a roll, so we also equipped the rover with a turret of ultrasonic sensors for Arduino-based autonomous roaming and object avoidance. The great thing about a good rover platform is that you can do all sorts of stuff with it. Thus far, we just have the basics for this robot in place. In the future, we’ll expand on capabilities. Among other things, we are currently working on a custom case for the HackHD camera for use with FPV Video Goggles. We’ll keep you posted.
As we built the rover, we discovered a number of features that we really liked about the Actobotics parts.
Actobotics provides a wonderful variety of useful interchangeable components: tubes, clamps, C channel, camera mounts, servo mounts, motor mounts, slides, swiveling hubs, brackets, pan-tilt turrets, motors, wheels, servos, shafts, the list goes on.
In this particular project, by using sections of Actobotics C Channel screwed together back-to-back we made compartments inside the rover chassis where we put the robot’s electronics, wires, and battery. This was a cool way to hide and protect everything “under the hood” and give the robot a clean, professional look.
The pre-drilled hole patterns in the C channel are primarily for attaching the various pieces together in various ways, and they work great for that, but we also found the hole patterns very useful for other purposes, like mounting a standard on/off switch, which fit in the hole perfectly. We also mounted the radio antenna in this way. And of course we utilized the holes when stringing the interior wires.
We discovered that the 5/8″ Bearing Hubs provide an excellent method for mounting Maxbotix ultrasonic sensors. We mounted three of them on a 45-degree Dual Bracket attached to an Actobotics servo horn, which created an awesome multi-directional, panning sensor turret.
On the camera turret, we thought it was great how we could use the 1/4″-20 Round Screw Plate to very easily mount a variety of cameras including a WiFi camera. The Round Screw Plate is also compatible with DSLR cameras.
We used the Actobotics GoPro mount kit to secure our GoPro camera in place.
The Actobotics pan-tilt turrets are second to none. We used one of these on our Mechatron robotic tank. The best part about these turrets is that they have 360-range and are extremely strong so they can handle cameras, airsoft guns, or whatever you want to put on them.
We also love the simplicity and strength of using the Actobotics motor mounts to secure the six motors to the underside of the frame. This is one beefy rover.
If you’ve ever built a wheeled robot before, you know that one of the most annoying challenges is when you’ve found some cool wheels, but you can’t get them to fit correctly on your motor shafts. It can be surprisingly difficult. Actobotics provides a vast array of wheel hubs, shaft adapters, and other parts for handling this problem. In this rover’s case, we utilized their 6mm Set Screw Hubs, 12mm Hex Wheel Adapters, and some burly RC-style rubber wheels.
Here is a complete list of the Actobotics parts we used to build the Actobot rover:
CHASSIS
(9) 6″ Aluminum Channel (585446)
(8) Flat dual Channel Bracket (585422
(2) 90-degree Quad Hub Mount C (545360)
(16) 90-degree Side Mount (585470). On 8 of these we drilled out the two threaded thru-holes.
MOTORS
(6) 90 RPM Precision Gear Motors (638238)
(6) Aluminum Clamping Motor Mount (555116)
(6) 18″ Battery/Motor Power Extensions (BE2418S)
WHEELS
(6) 12mm Hex Wheel Adapters (545432)
(6) 6-spoke Wheels (81773)
(6) Speed Paw Tires (PROC1047)
(6) 0.770″ Set Screw Hubs with 6mm Bore (545576)
CAMERA TURRET
(2) Channel Mount Servo Power Gearbox – 360 Rotation (SPG5485A-CM-36005A)
(1) 3.75″ Aluminum Channel (585443)
(1) 90-degree Quad Hub Mount C (545360)
(4) 90-degree Single Angle Short Channel Bracket (585506)
(1) 90-degree Hub Mount Bracket A (585494)
CAMERA MOUNTS
(1) GoPro Mount Kit (Hero 3) (585518)
(1) 1/4-20 Round Screw Plate (545468) (For mounting Wifi, DSLR or any other standard camera)
ULTRASONIC SENSOR TURRET
(3) 5/8″ Bore Flat Bearing Mount (534122)
(1) 90-degree Dual Angle Channel Bracket (585426)
(1) 90-degree Single Angle Channel Bracket (595424)
(12) #6-32 Aluminum Standoffs 0.875″ (534-1848)
REMOTE CONTROL (RC)
(1) Futaba Transmitter
(1) Futaba Receiver
Please note that we used a variety of #6-32 socket head machine screws, which can also be purchased from ServoCity. For the electronics, we used an Arduino Leonardo (although any type of Arduino would work), Maxbotix ultrasonic sensors, and a Sabertooth 2×5 RC motor controller from Dimension Engineering. Our version of this robot includes both RC-airplane-style Remote Control (RC) as well as Arduino-based autonomous roaming. In many cases, you’ll only need/want one or the other approach, not necessarily both at the same time the way we did it.
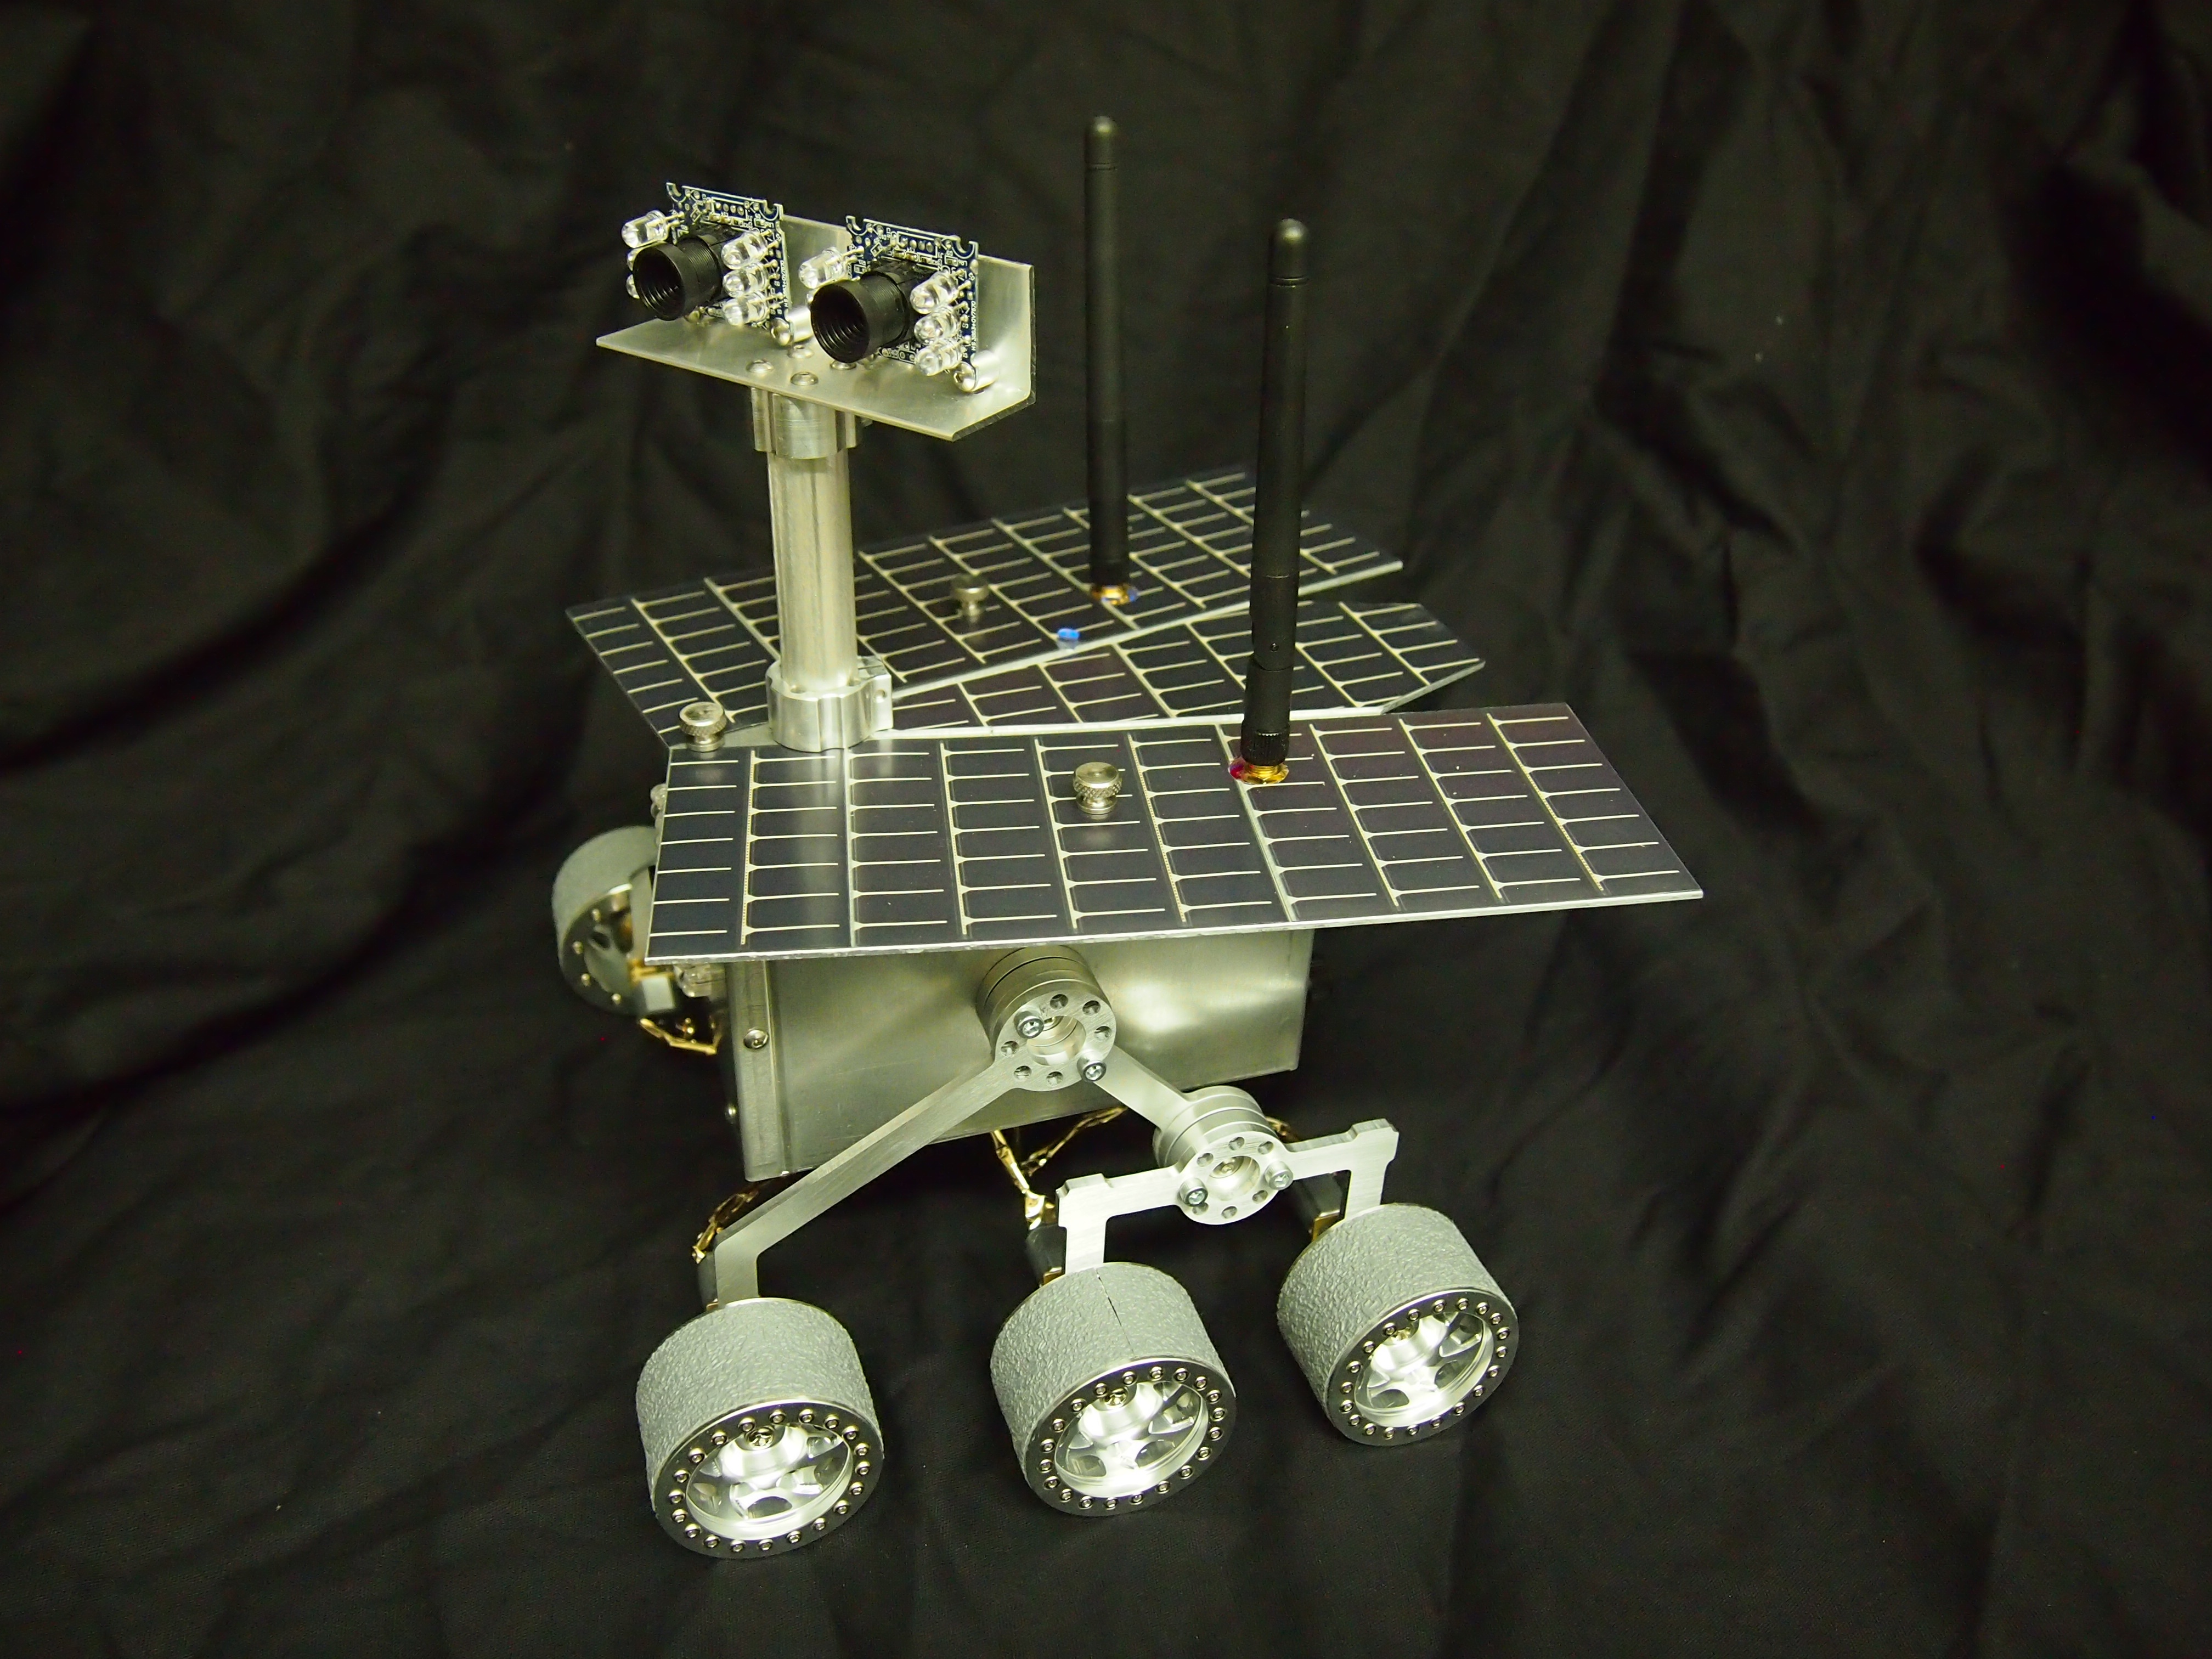
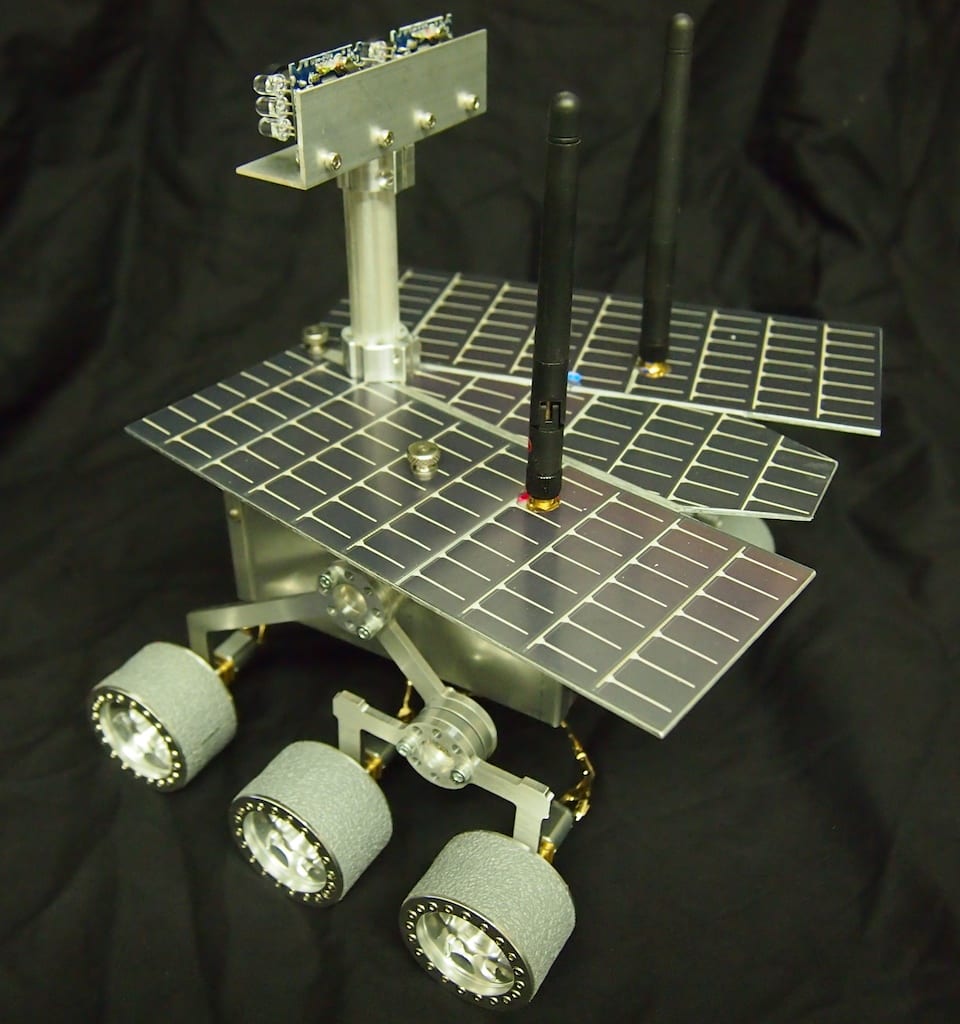
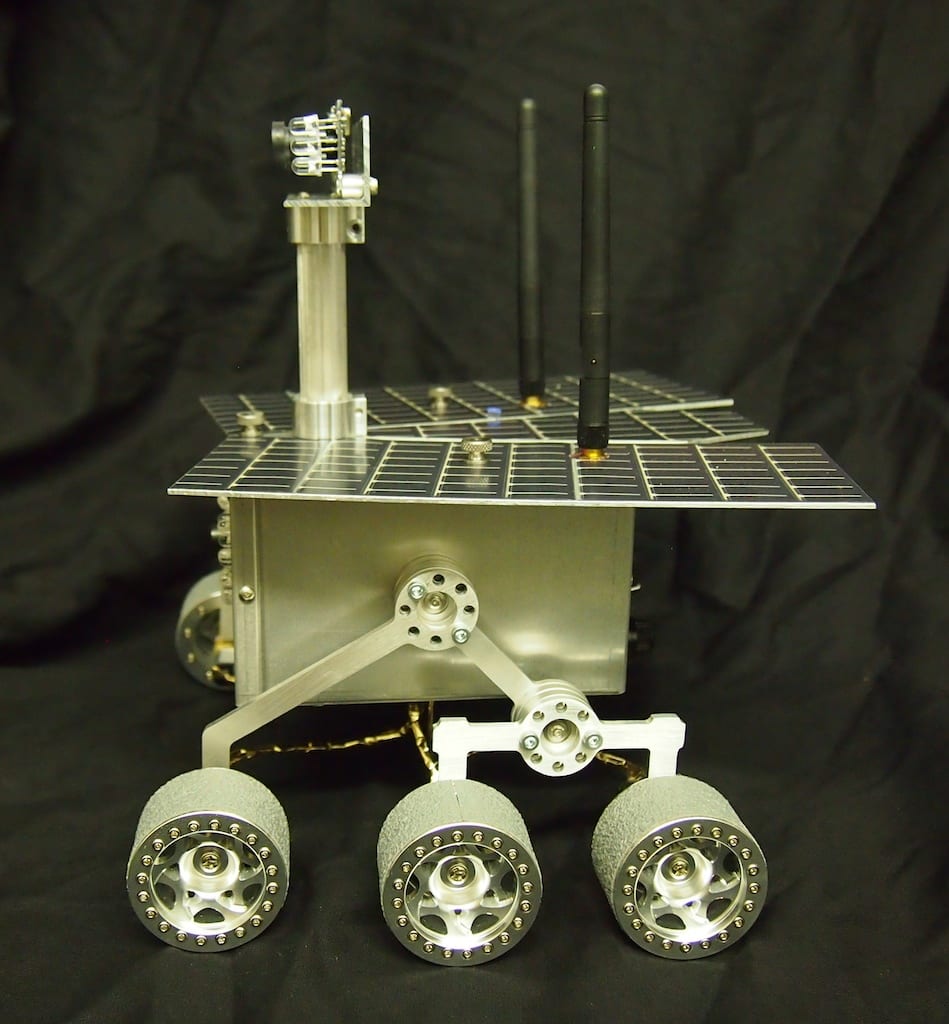
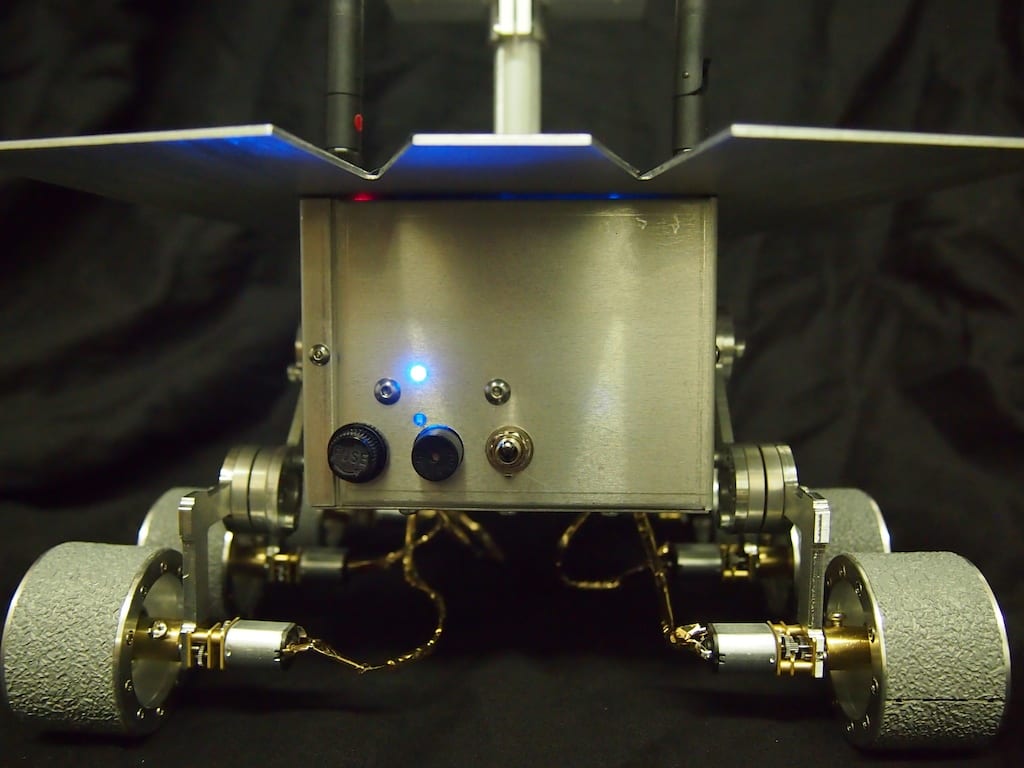
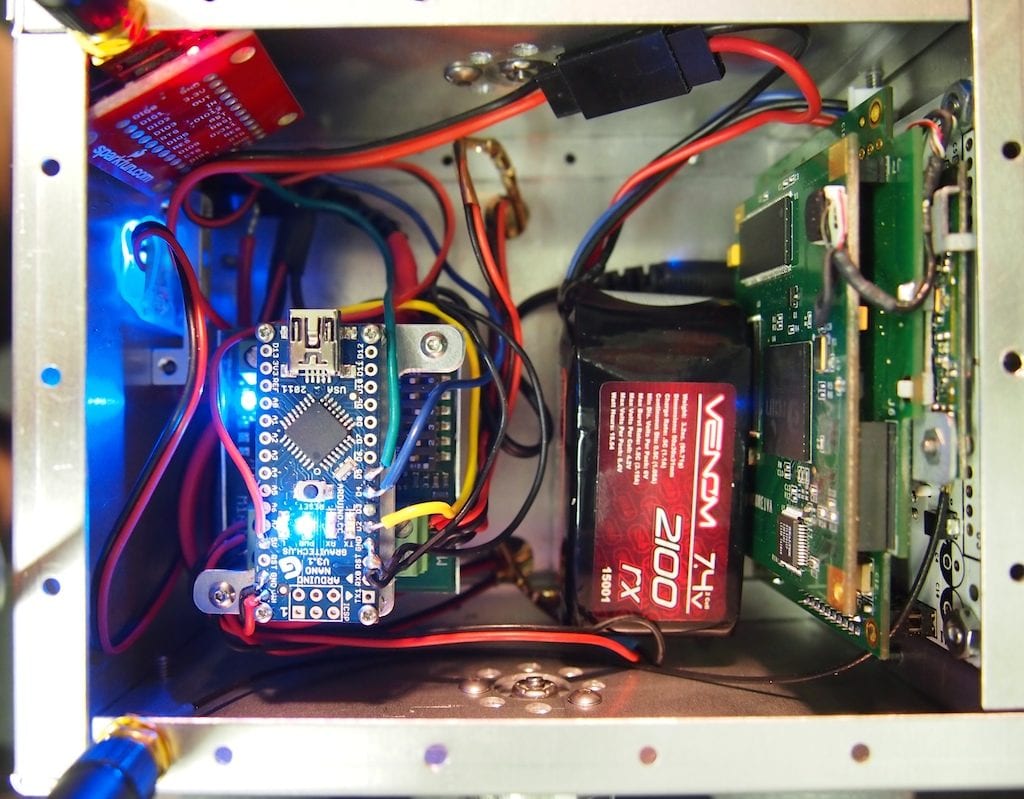
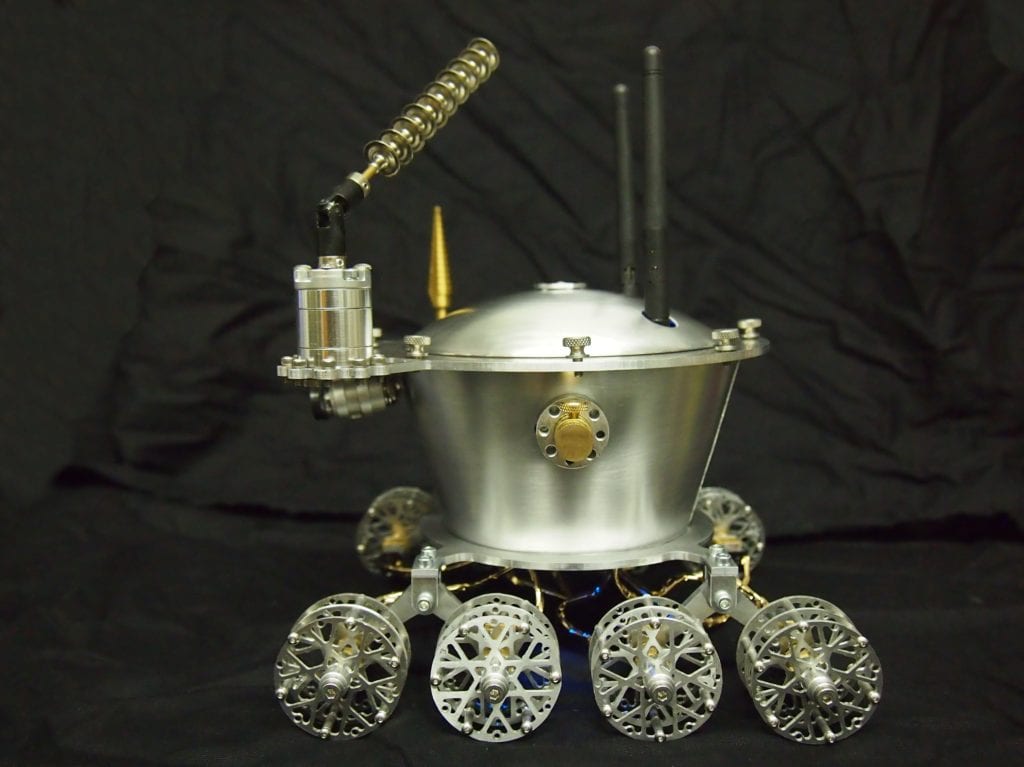
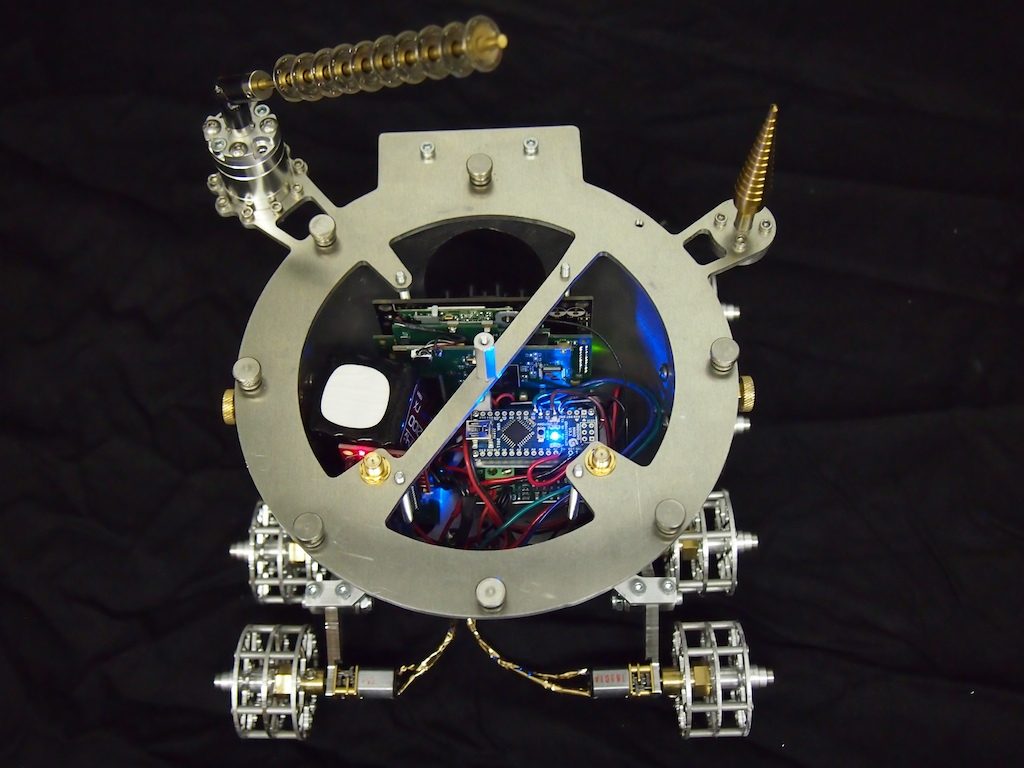
Recently we were asked to build a miniature Mars Rover for a new space museum in the Czech Republic. Although the Mini Mars Rover is only about 8″ long, it is a functional robot, including an Arduino Nano microcontroller, a high-resolution wifi camera, an xbee radio for remote control, a Sabertooth motor controller, six motors, a rocker-bogie suspension system, and other components. We designed and machined most of the robot’s parts using our CNC Mill.
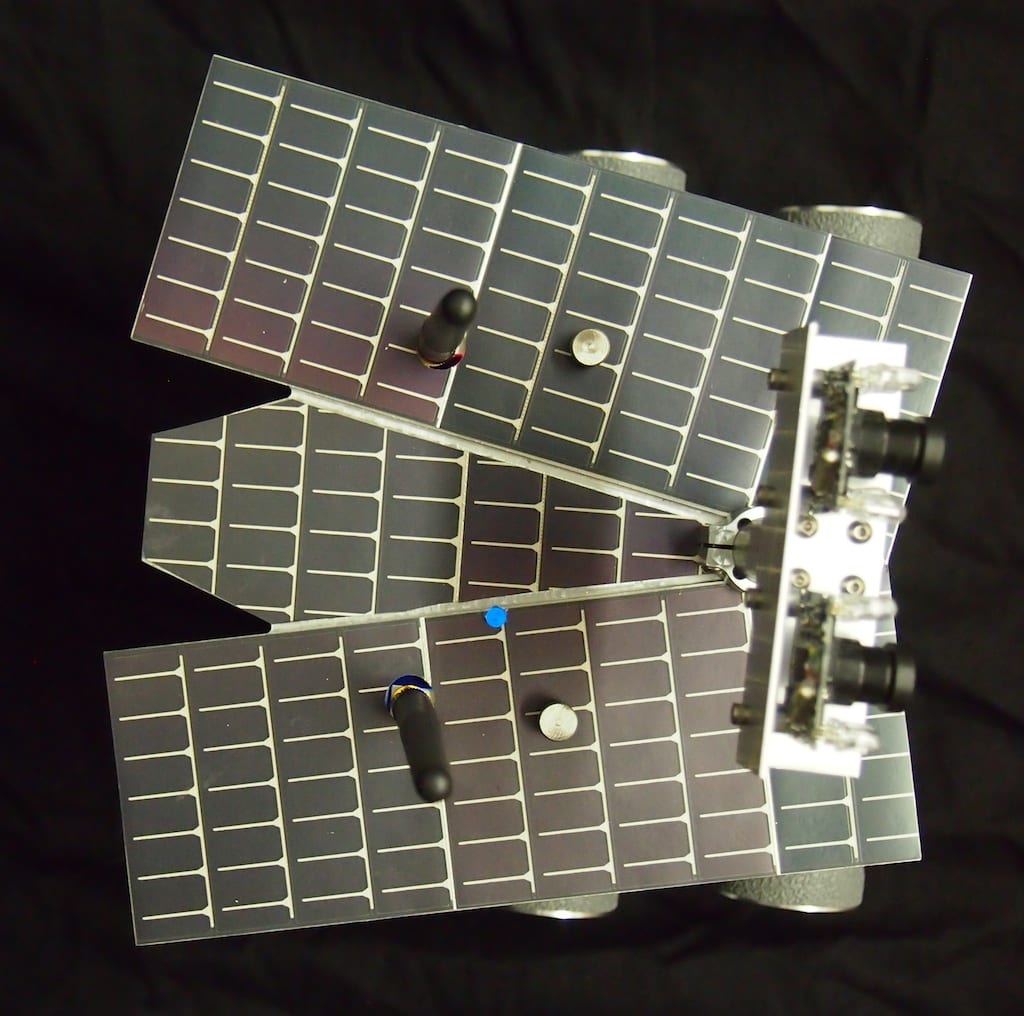
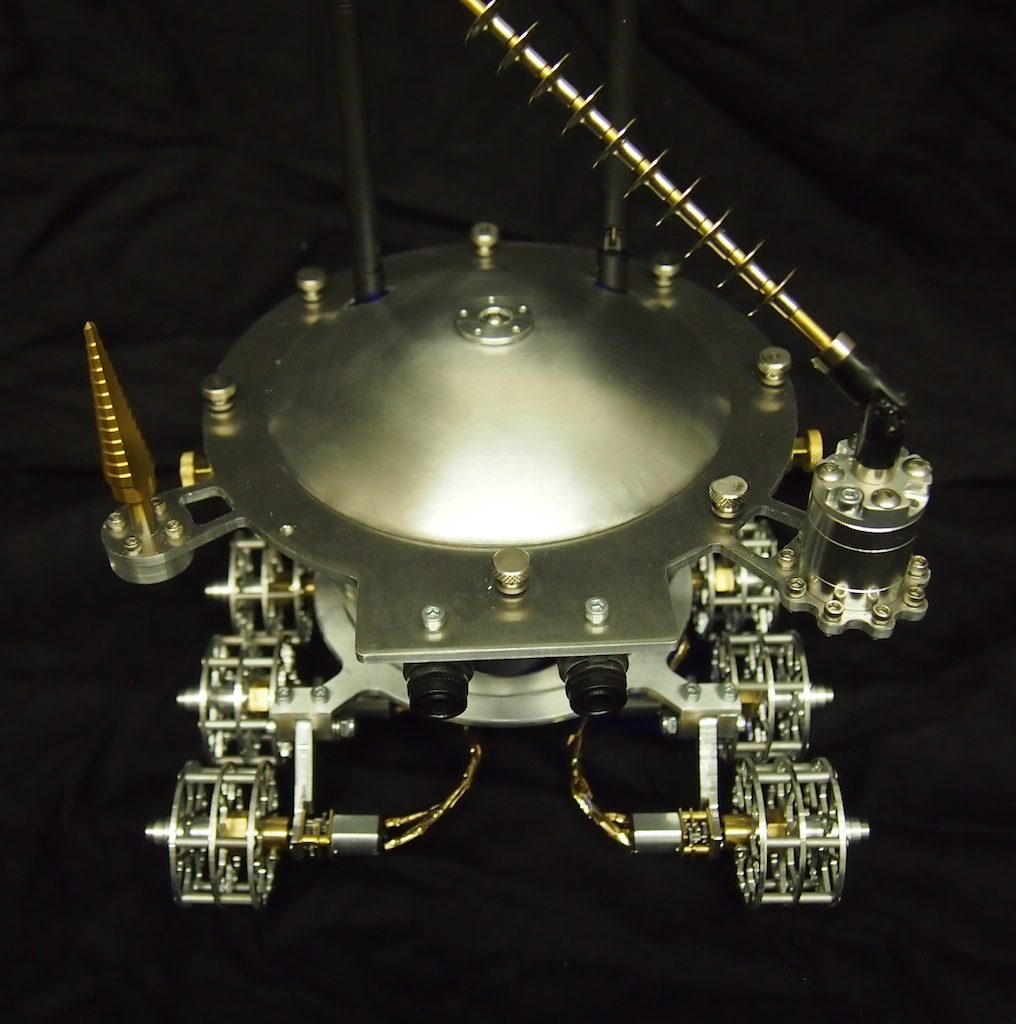
Mini Mars Rover – Top Rear View
Mini Mars Rover – Side View
Mini Mars Rover – Top View
Mini Mars Rover
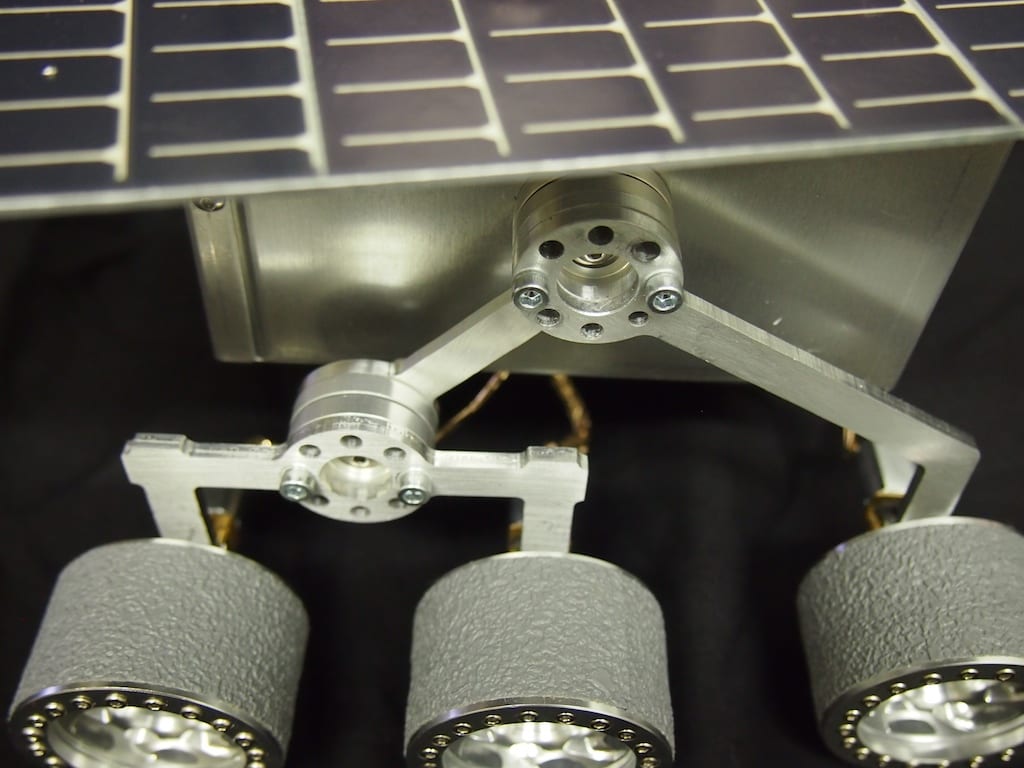
Mini Mars Rover – Rocker-Bogie Suspension System Close Up
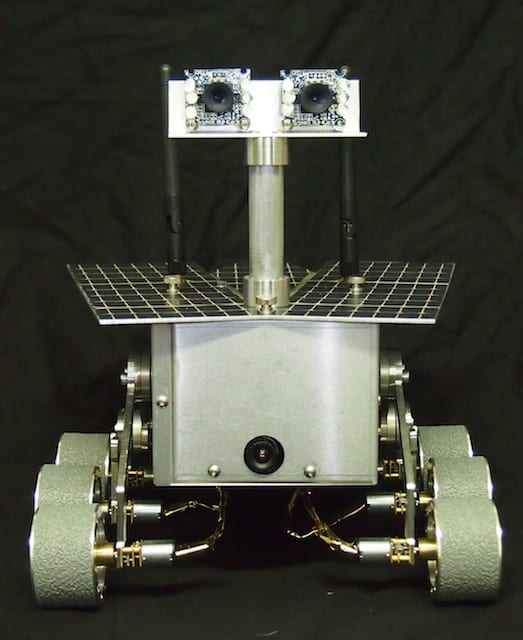
Mini Mars Rover – Front View
Mini Mars Rover – Rear View
Mars Rover Top Plate immediately after it has been CNC machined but before the solar panels have been applied.
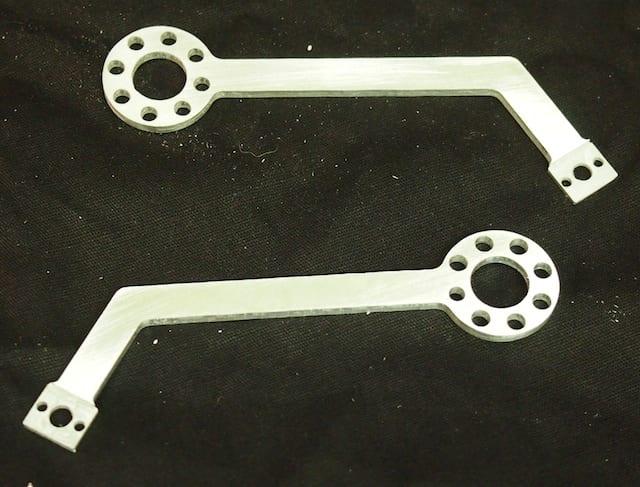
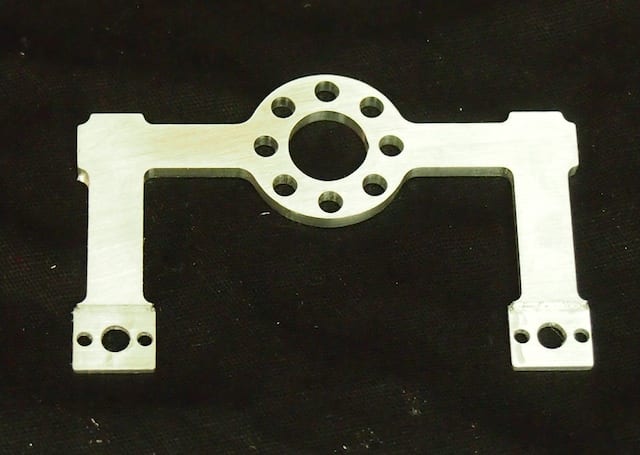
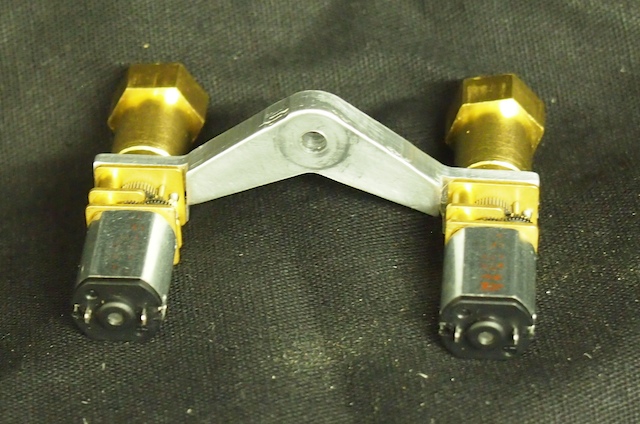
Front Arms with motor mounts
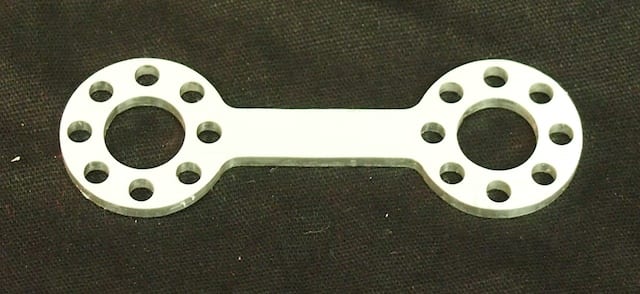
Rear Arm
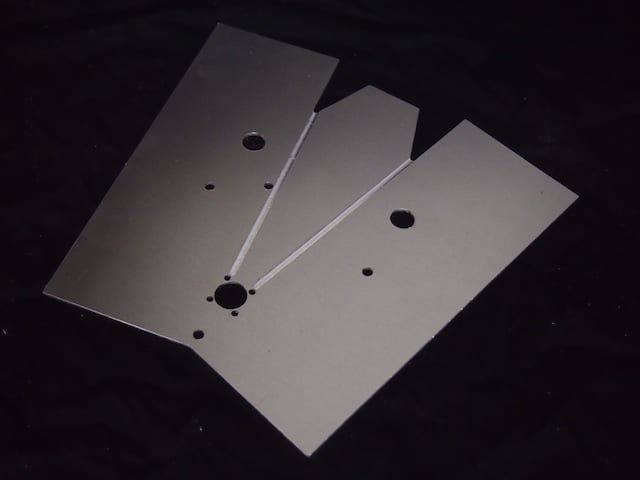
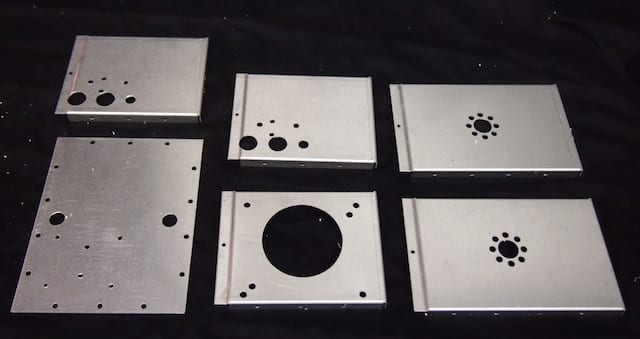
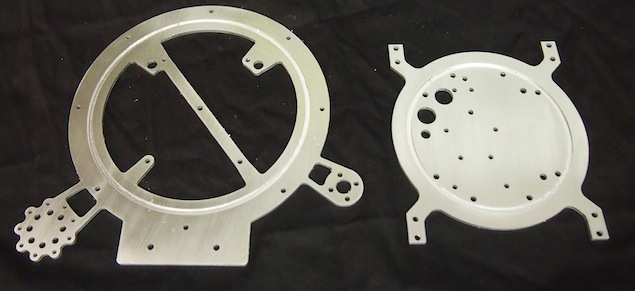
Mini Mars Rover Back Plate, Bottom Plate, Front Plate, and Side Plates. The newer version has a smaller hole for the camera.
Lunokhod, which means “Moon Walker” in Russian, was the first roving remote-controlled robot to operate on another terrestrial body. The Soviet Union landed it on the moon in 1970 equipped with a conical antenna, a large directional antenna, two television cameras (the eyes), and a vast array of sensors.
Beatty Robotics was asked to build a functional Lunokhod robot for a new space museum that is being built in Prague in the Czech Republic. As soon as we saw Lunokhod’s Jules Vernes steampunk design we fell in love with it. We were excited to begin. The real Lunokhod is about 8′ long. The museum wanted a miniature version that fit in their exhibit, so ours is about 8″ long. Visitors to the museum will operate it by remote control using the First Person View (FPV) camera.
Lunokhod includes an Arduino Nano microcontroller, an Xbee radio, a Sabertooth motor controller, 8 gear motors, 8 custom-machined wheels, a custom-machined rocker-bogie suspension system, a tub-shaped body, a domed top, a wifi camera, and other components. Because of the robot’s unusual appearance, we designed and machined nearly all of the parts on our CNC, including the spoked wheels, the wheel rockers, the base plate, the rim plate (which turned out to be the most complex part we have ever machined). Working with the truncated-cone of the tub-shaped body was also particularly difficult. But in the end, we love how it all turned out. We hope you like it, too. Pictures and video below.
A photograph of the real Lunokhod robot
Drawing of the original Lunokhod robot
Lunokhod by Beatty Robotics
Lunokhod – Side View
Lunokhod Front View. The black circle at the bottom is a high-definition wifi camera that provides a First Person View (FPV) to the person operating the robot.
Lunokhod with its top removed so that the electronics are visible inside, including the wifi camera, which takes up most of the room. The Arduino Nano, motor controller, and voltage booster are stacked vertically with custom-machined plates in order to fit them inside. The white and black thing is the 7.4V LIPO battery. The rim plate, with its complex inner and outer contours, many holes, and intricate antenna mounting platforms is the most complex part we’ve ever machined. Lunokhod – Top Front View, showing its domed top, directional antenna, and cone-shaped antenna. Close up of the Lunohod Wheels. Each wheel consists of 3 separate CNC-machined sub-wheels, plus many machine screws, standoffs, and spacers. These wheels are the most finely intricate machining we’ve done to date. Lunokhod’s Rim Plate and Base Plate. The two are held together by four long threaded machine screws. Each plate has a round slot so that when they are sandwiched together they hold the cone-shaped body in place. The base plate includes four extensions that hold the four rockers. It also has many holes for securing the electronics and other components. The rim plate includes holes for securing the conical antenna, directional antenna, eyes, and antennas. Lunokhod has two rockers on each side. Each rocker allows two wheels to rock on an axle shaft. The micro gear motors are mounted to special surfaces machined into the rocker. This picture shows the 33 parts that are assembled into each wheel. A fully-assembled wheel is shown on the left.
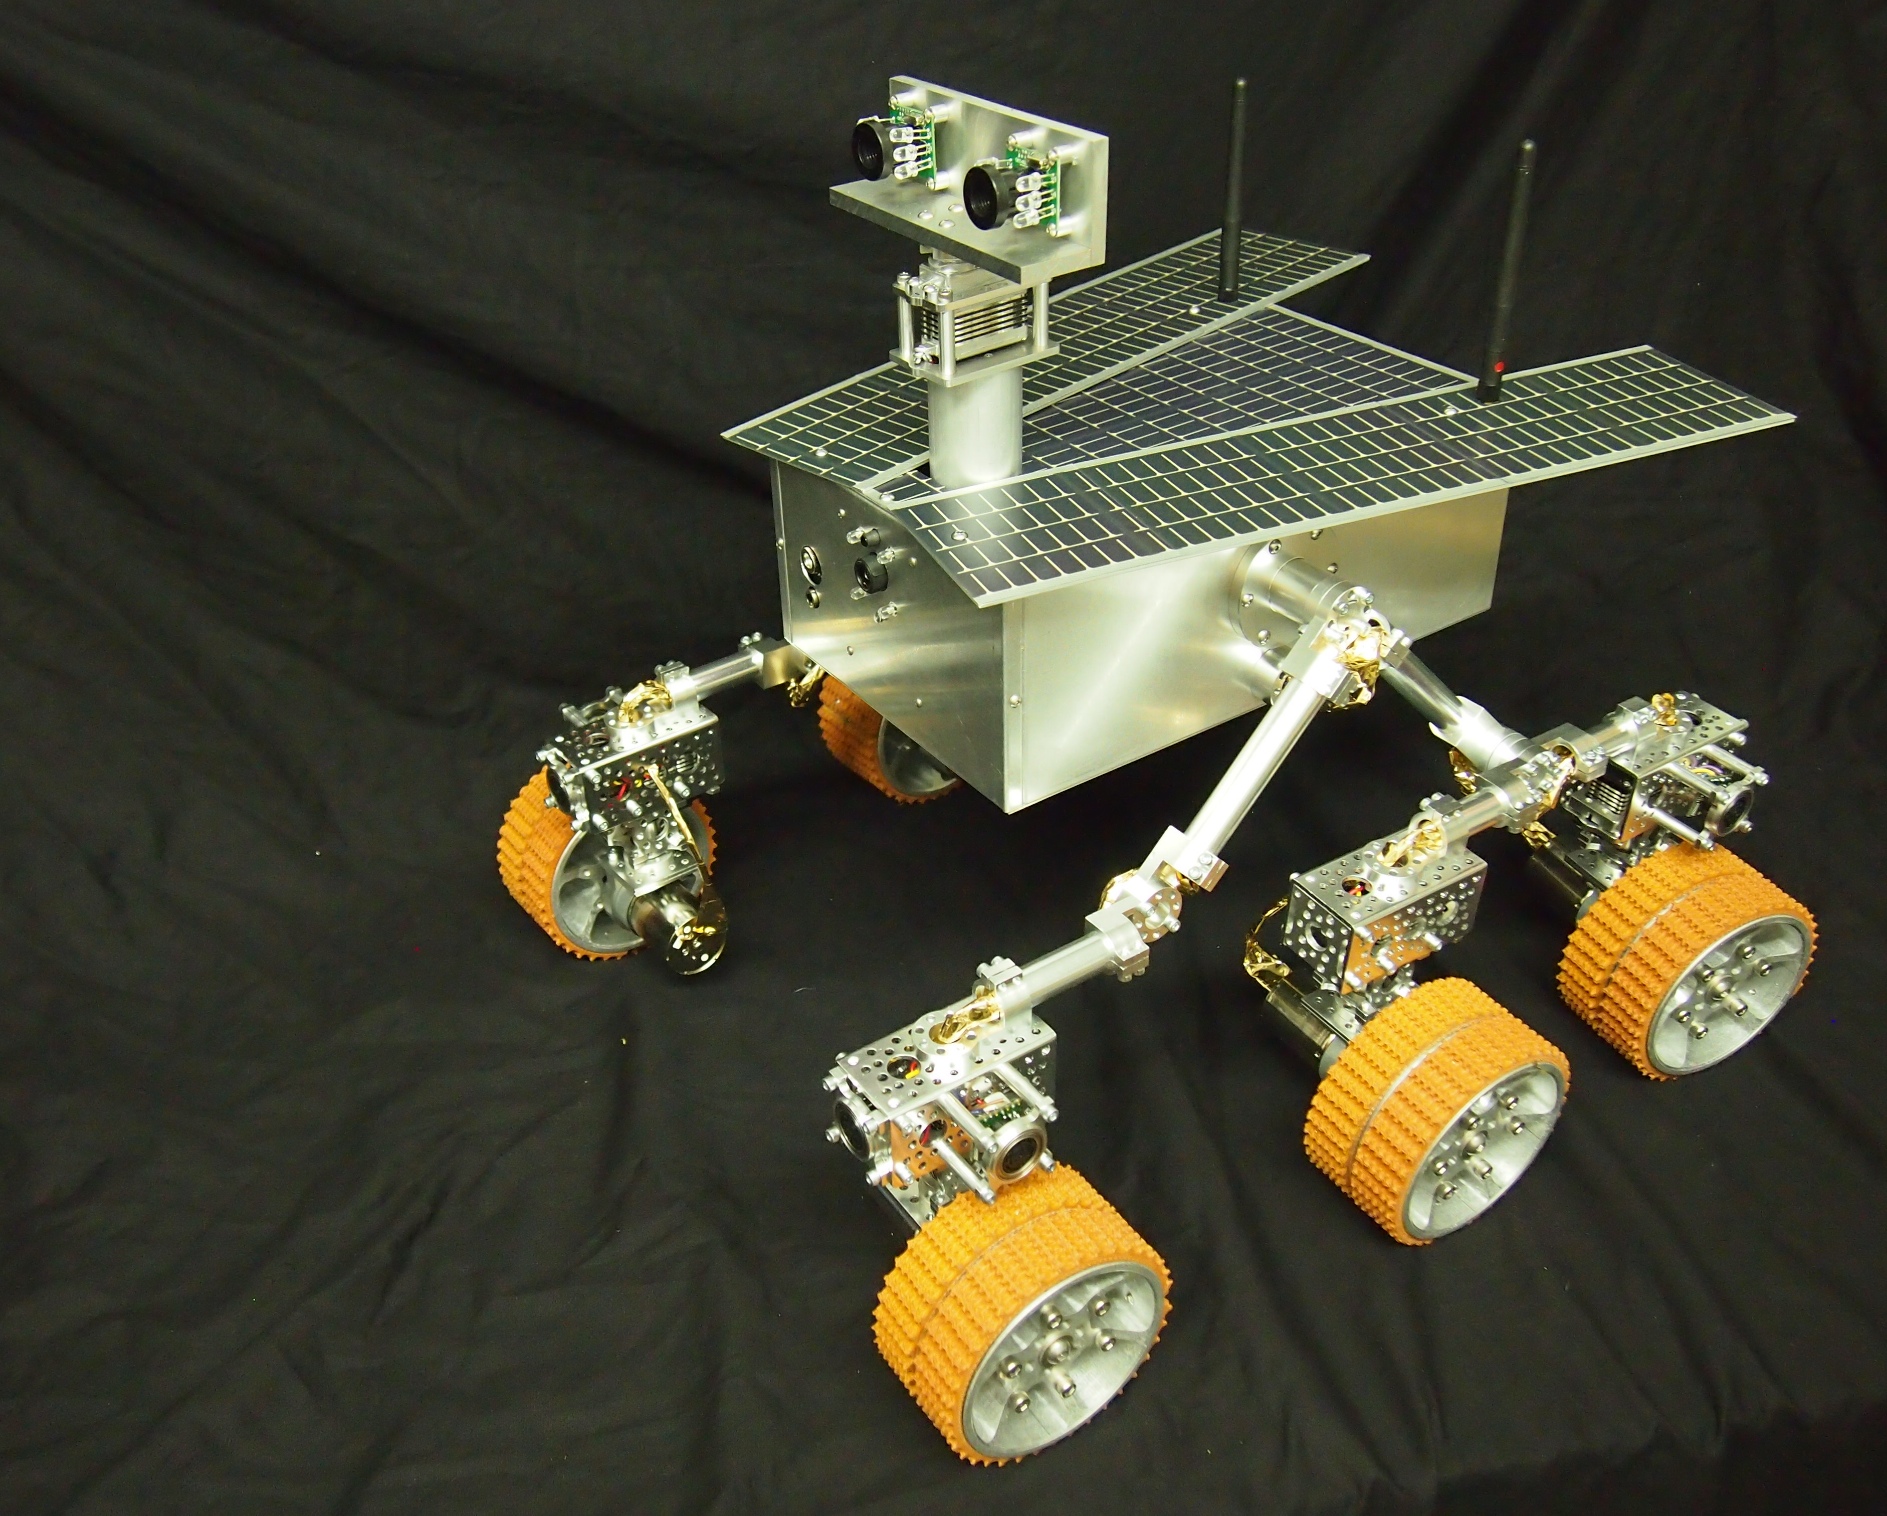
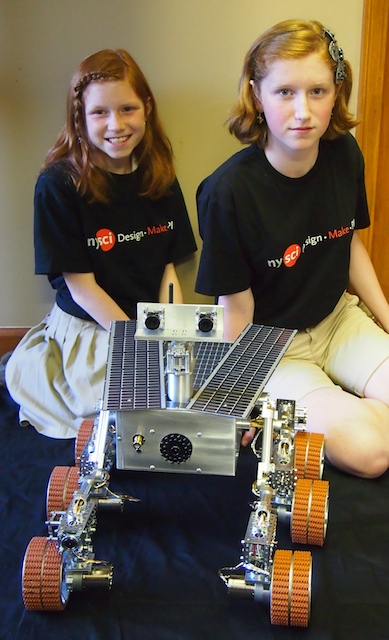
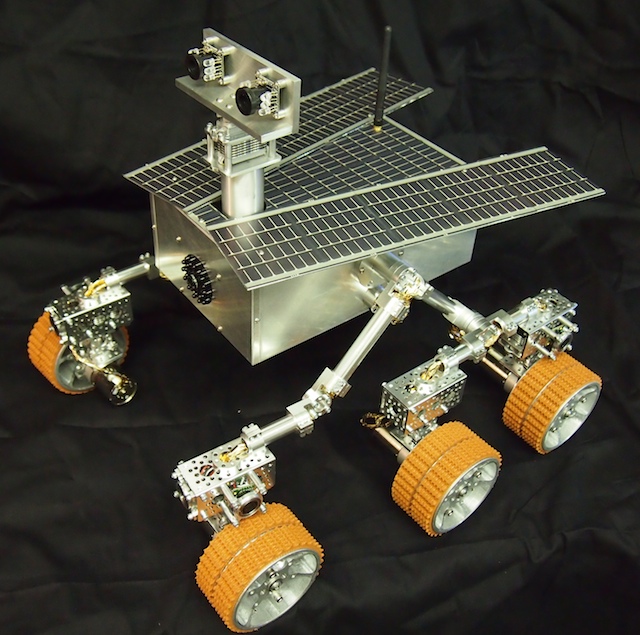
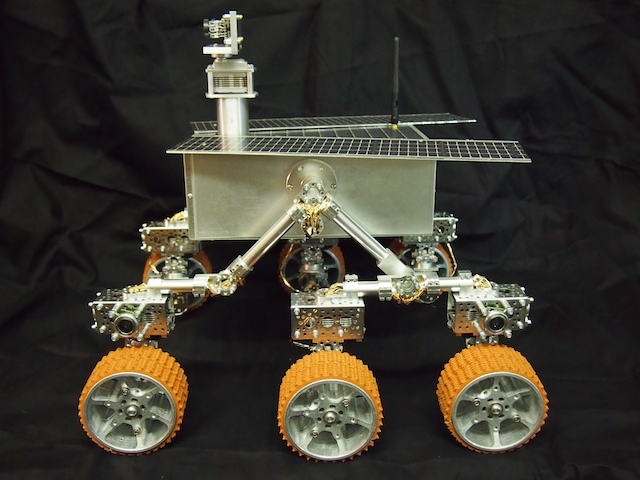
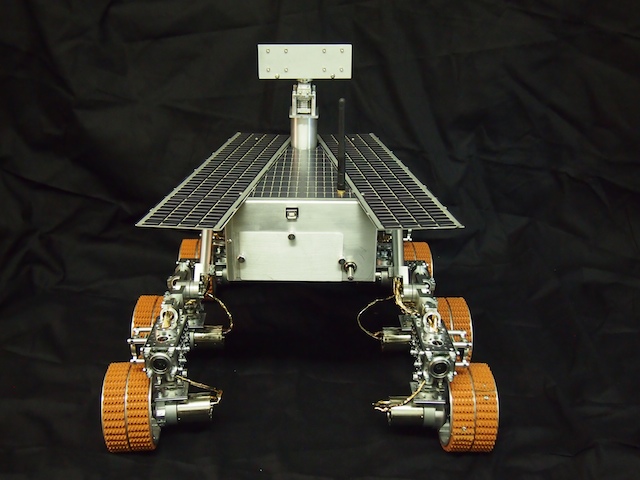
We have exciting news to share. A short time ago the New York Hall of Science contacted us. They have a large and beautiful Mars exhibit, but their existing robot is outdated and needs to be replaced. After some discussion about their requirements, we agreed to build them a new fully-functional Mars Rover robot for their exhibit. You may have noticed that we’ve been chronicling our work on the new rover in our Workshop Blog for the last several weeks. We have done most of the metal machining, mechanical assembly, electrical soldering, electronics wiring, and other work on the project. They will also be part of the on-site testing and installation in New York. Update: We installed the Mars Rover at the New York Hall of Science on June 8, 2013. It has been a great success so far. It has become the science center’s most popular exhibit.
The Mars Rover is constructed of over 700 electrical components, aluminum parts, and other pieces that we purchase, make by hand, and/or machine on our homemade CNC Mill. In addition to the NASA-style six-wheeled rocker-bogie suspension system and the solar panels, the new Mars Rover is equipped with an infrared camera, a thermal array sensor, eight sonar sensors, and other technology. Using special control software that we will provide, kids and other visitors to the center will drive the Mars Rover remotely through the exhibit’s Mars-scape on a mission to find infrared-emitting rocks that may provide evidence of past life on Mars.
With over 450 interactive exhibits, the New York Hall of Science is the largest collection of hands-on science and technology exhibits in the New York City area, and rated as one of the best science centers in the country. They are actively involved in pioneering the Design/Make/Play revolution. Built initially as a pavilion for the 1964 World’s Fair, the New York Hall of Science is not only the region’s premier science museum, it hosts the world-renown New York Maker Faire each fall. We are honored to be working with the NYSCI and we’ve been having great fun (and many hours of hard work) building what we hope will be an excellent robot for them.