
Over the years, we’ve used a lot of different parts to build robots. Lately we’ve been using more and more parts from the new Actobotics product line, which we buy from sites like ServoCity.com and RobotShop.com and Sparkfun.com. A short time ago, the Actobotics team approached us about sponsoring our next build. They asked us to design and construct our next robot entirely out of their parts. When we asked about the project requirements, they said, “Use your imagination. Build whatever your want.” We were delighted to accept their offer. They sent us a box of Actobotics parts and we started exploring what we could do.
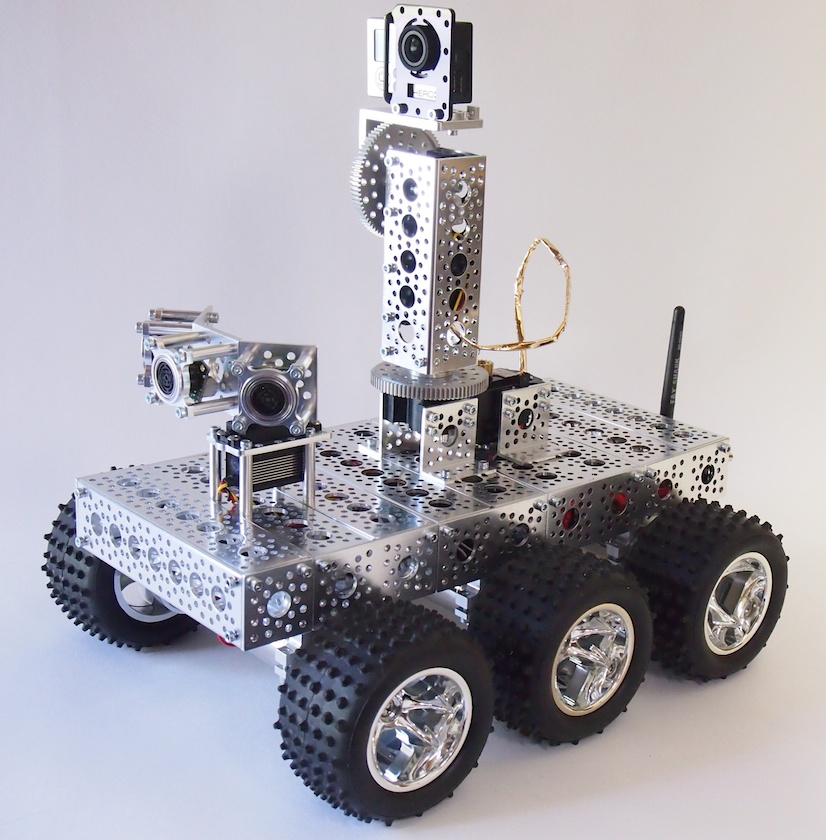
We were really impressed by the quality of the machined aluminum parts and the powerful flexibility of their modular, interchangeable design. The parts use two overlapping hole patterns and standardized dimensions so that you can build a lot of different things in a lot of different ways. We soon realized that we could make a dozen different kinds of robots with these parts. But eventually, we came up with a super cool, multi-use 6WD rover. We equipped it with a pan-tilt camera turret with changeable mounts for a Wifi Camera, GoPro Camera, or HackHD FPV camera. This platform would also make a great gun turret for an Airsoft pellet gun or a paintball gun. We were on a roll, so we also equipped the rover with a turret of ultrasonic sensors for Arduino-based autonomous roaming and object avoidance. The great thing about a good rover platform is that you can do all sorts of stuff with it. Thus far, we just have the basics for this robot in place. In the future, we’ll expand on capabilities. Among other things, we are currently working on a custom case for the HackHD camera for use with FPV Video Goggles. We’ll keep you posted.
As we built the rover, we discovered a number of features that we really liked about the Actobotics parts.
- Actobotics provides a wonderful variety of useful interchangeable components: tubes, clamps, C channel, camera mounts, servo mounts, motor mounts, slides, swiveling hubs, brackets, pan-tilt turrets, motors, wheels, servos, shafts, the list goes on.
- In this particular project, by using sections of Actobotics C Channel screwed together back-to-back we made compartments inside the rover chassis where we put the robot’s electronics, wires, and battery. This was a cool way to hide and protect everything “under the hood” and give the robot a clean, professional look.
- The pre-drilled hole patterns in the C channel are primarily for attaching the various pieces together in various ways, and they work great for that, but we also found the hole patterns very useful for other purposes, like mounting a standard on/off switch, which fit in the hole perfectly. We also mounted the radio antenna in this way. And of course we utilized the holes when stringing the interior wires.
- We discovered that the 5/8″ Bearing Hubs provide an excellent method for mounting Maxbotix ultrasonic sensors. We mounted three of them on a 45-degree Dual Bracket attached to an Actobotics servo horn, which created an awesome multi-directional, panning sensor turret.
- On the camera turret, we thought it was great how we could use the 1/4″-20 Round Screw Plate to very easily mount a variety of cameras including a WiFi camera. The Round Screw Plate is also compatible with DSLR cameras.
- We used the Actobotics GoPro mount kit to secure our GoPro camera in place.
- The Actobotics pan-tilt turrets are second to none. We used one of these on our Mechatron robotic tank. The best part about these turrets is that they have 360-range and are extremely strong so they can handle cameras, airsoft guns, or whatever you want to put on them.
- We also love the simplicity and strength of using the Actobotics motor mounts to secure the six motors to the underside of the frame. This is one beefy rover.
- If you’ve ever built a wheeled robot before, you know that one of the most annoying challenges is when you’ve found some cool wheels, but you can’t get them to fit correctly on your motor shafts. It can be surprisingly difficult. Actobotics provides a vast array of wheel hubs, shaft adapters, and other parts for handling this problem. In this rover’s case, we utilized their 6mm Set Screw Hubs, 12mm Hex Wheel Adapters, and some burly RC-style rubber wheels.
Here is a complete list of the Actobotics parts we used to build the Actobot rover:
CHASSIS
-
- (9) 6″ Aluminum Channel (585446)
- (8) Flat dual Channel Bracket (585422
- (2) 90-degree Quad Hub Mount C (545360)
- (16) 90-degree Side Mount (585470). On 8 of these we drilled out the two threaded thru-holes.
MOTORS
-
- (6) 90 RPM Precision Gear Motors (638238)
- (6) Aluminum Clamping Motor Mount (555116)
- (6) 18″ Battery/Motor Power Extensions (BE2418S)
WHEELS
-
- (6) 12mm Hex Wheel Adapters (545432)
- (6) 6-spoke Wheels (81773)
- (6) Speed Paw Tires (PROC1047)
- (6) 0.770″ Set Screw Hubs with 6mm Bore (545576)
CAMERA TURRET
-
- (2) Channel Mount Servo Power Gearbox – 360 Rotation (SPG5485A-CM-36005A)
- (1) 3.75″ Aluminum Channel (585443)
- (1) 90-degree Quad Hub Mount C (545360)
- (4) 90-degree Single Angle Short Channel Bracket (585506)
- (1) 90-degree Hub Mount Bracket A (585494)
CAMERA MOUNTS
-
- (1) GoPro Mount Kit (Hero 3) (585518)
- (1) 1/4-20 Round Screw Plate (545468) (For mounting Wifi, DSLR or any other standard camera)
ULTRASONIC SENSOR TURRET
-
- (3) 5/8″ Bore Flat Bearing Mount (534122)
- (1) 90-degree Dual Angle Channel Bracket (585426)
- (1) 90-degree Single Angle Channel Bracket (595424)
- (12) #6-32 Aluminum Standoffs 0.875″ (534-1848)
REMOTE CONTROL (RC)
-
- (1) Futaba Transmitter
- (1) Futaba Receiver
Please note that we used a variety of #6-32 socket head machine screws, which can also be purchased from ServoCity. For the electronics, we used an Arduino Leonardo (although any type of Arduino would work), Maxbotix ultrasonic sensors, and a Sabertooth 2×5 RC motor controller from Dimension Engineering. Our version of this robot includes both RC-airplane-style Remote Control (RC) as well as Arduino-based autonomous roaming. In many cases, you’ll only need/want one or the other approach, not necessarily both at the same time the way we did it.
Update: We designed a custom case for the Hack HD camera.

That is an amazing project. Do you teach or build for individuals? I would love to learn more!
The Robotsters are on a roll. Terrific stuff. I can’t wait to see the next update.
Richard
I have seen that you use Solidworks CAD for some of your robots. Do you know if anyone has Solidworks parts files for the actobot parts? I know the similar Vex parts have CAD files, but I can’t find any for the Actobot parts.
Floyd: I’ve talked to the people at Acobotics (ServoCity/Robotzone) about SolidWorks last fall. They don’t use SolidWorks in house, so they don’t have SolidWorks files for their parts. However, Sparkfun has just started carrying the Actobotics line. They are trying to provide SketchUp files for the Actobotics parts. For example, they do so on this page: https://www.sparkfun.com/products/12122
Perhaps the SketchUp files might help you. —Camille
Thanks for the link on the elector set link on sparkfun. Wonder why aluminum? The price is good. If I wanted to create a prototype that requires rigidity, steel would be a better choice. I suspect these erector set style parts are more for learning then anything else.
How ever, they do look nice. I wonder if these parts can fit 80/20 extruded parts.
Lorin: Aluminum is awesome. It’s strong, light, easy to work with, highly machinable, and looks great. We love it. These parts aren’t just for learning, they’re for building real stuff. They are especially good for prototypes. Once you build something with the Actobotics parts, I think you’ll be very impressed by how strong and rigid they are.
Hello,
Very inspiring! The problem I am running into is that I have ideas for rovers and such but how do I go about turning that into reality with Actobotics? Servo City obviously has the ultimate selection of parts but without having a schematic ahead of time and knowing what parts exist to fit that schematic…? Concept to design to build. Basically putting 2+2 together is where I am breaking down. Is there a place where I can find a schematic of a Actobotics design so I can get an idea of how all the part might actually fit together?
Thanks for any help and advice!
Cheers,
Andrew
A list of parts for making the Actobot is shown on this page. Once you have them in your hand and you start working with them, you’ll find that they are pretty easy to put together. Once you build one small structure of any kind (doesn’t need to be the Actobot) using the Actobotics parts, you’ll quickly get the hang of it. You’ll be able to look at the pictures of the components on the website and visualize how they go together.
no video?