We enjoy machining custom aluminum robot parts on our CNC Mill. One of the best things about a CNC is that it can cut precise parts by following the geometry of a CAD drawing. We measure the precision and repeatability of our CNC in thousandths of an inch (0.001). But one of the challenges of using a CNC is to to get the raw material setup properly and make sure the spindle starts at exactly the right position. The CNC can only hold a precise position from its starting point. For example, let’s say you want to cut a pocket that is .050″ deep. That’s easy to do, but you need to start the CNC at the exact surface of the raw material so that it knows how far down along the Z-axis to move the spindle. Or let’s say you need to drill a precise hole pattern in a square sheet of aluminum. That’s easy to do, but you need to start the CNC at the exact corner of the square or your pattern will be way off. Finding the exact starting point is called “zeroing” the CNC. There are whole books written on the subject and a whole sub-industry of gizmos for handling this challenging problem. It took us a while to figure out, but this is what we’ve found to be the best solution for us:
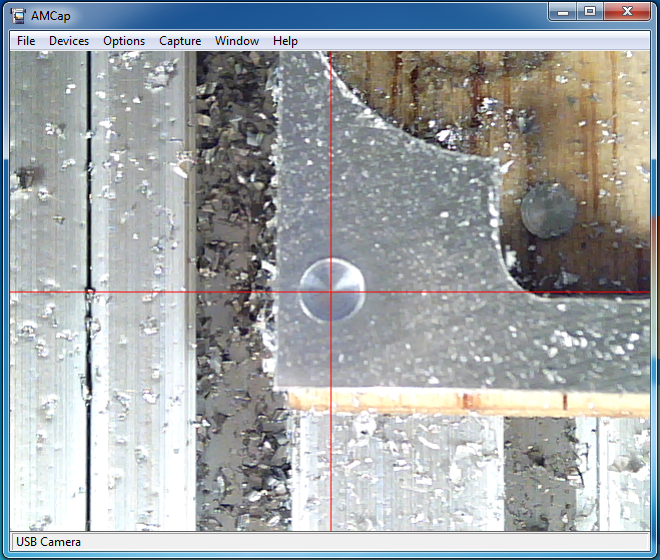
1. When it comes to zeroing out the X and Y position of the CNC at the beginning of a job, we have tried a number of approaches, including eye-balling (not very accurate), mechanical edge finders (don’t like these), and even a laser edge finder (not as accurate and cool as you’d think). For our solution, we installed a super-cool USB camera microscope from our friends at Adafruit onto the frame of our spindle. We mounted the camera using a small aluminum bracket that we designed in SolidWorks and machined on our CNC. We secure the camera bracket to the spindle frame using a 4-40 threaded hole that we tapped for that purpose. The microscope camera points downward toward the raw material. It displays a large, magnified image on the computer screen, including crosshairs. When we want to set the X and Y zero point, we turn on the camera and then move the spindle until the crosshairs line up exactly with the corner of the raw material (or whatever position we want to identify as the zero point). Because it’s a microscope, it’s very precise. We then press the Mach3 “REF ALL HOME” button, which we’ve re-purposed and re-programmed to set the X=0 and Y=0 based on the offset distance between the camera crosshairs and the spindle position. This allows us to quickly and easily zero out the X and Y axis to the exact point we need to.
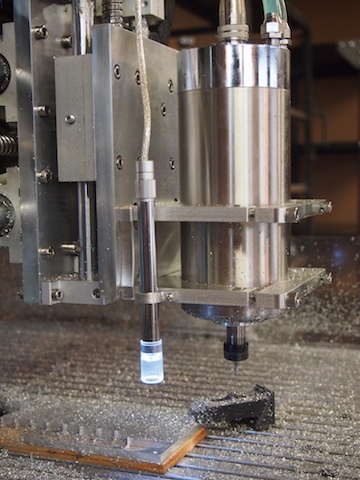
The microscope camera is the tall, tube-shape thing clamped to the edge of the spindle mount. It has a built-in ring of LED lights to illuminate the subject area. 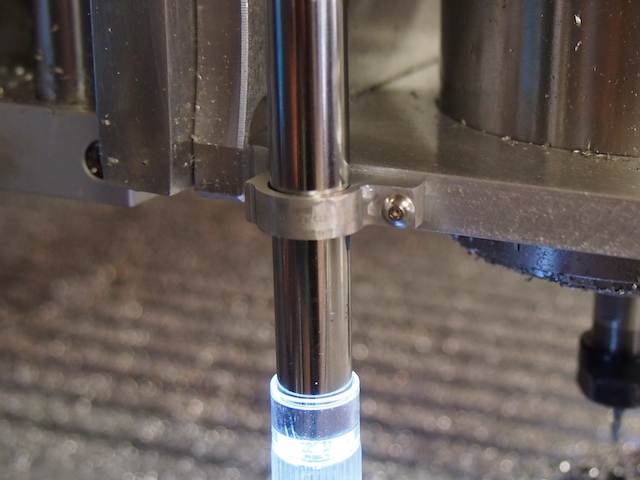
Close-up of the custom bracket we made to hold the tube-shpaed camera to the spindle frame
2. The Z-axis, which is the vertical position of the spindle, is by far the most important axis to zero out properly. For this, we rigged up a very cool solution that works great. We cut a piece of copper-clad circuit board (about 1″ x 1″) and soldered it to a long wire that we ran back to one of the 5 volt inputs on our controller. We ran another wire from the base of the CNC. These two wires, combined with the CNC and the end mill (which are both conductive), become like the leads of a voltmeter that is setup to test conductivity. We then wrote a macro in the BASIC language that runs when we press the “Auto Zero Tool” button on the Mach3 interface. When we want to zero-out the z-axis, we place the copper plate on the top of the raw material and press the button. The CNC moves the spindle slowly down toward the plate. The instant the tip of the end mill touches the copper plate the electrical circuit is closed. The macro instantly stops the spindle, sets the Z-axis zero point (by subtracting the .063″ thickness of the plate), and then moves up .125″ so that the copper plate can be removed. The whole process only takes a few seconds to complete. And the result is that the CNC determines exactly where the top surface of the material is and sets it as Z = 0.
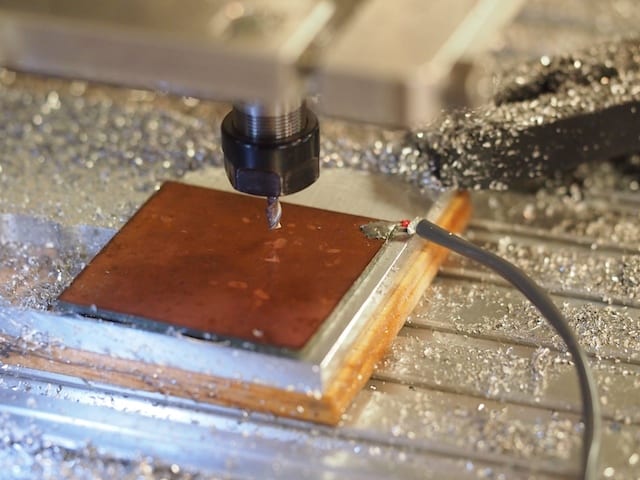
The zero plate is placed on top of the raw material. The macro automatically moves the spindle down until the end mill touches the plate and closes the electrical circuit, which signals the CNC to zero the z-axis. Note the wire soldered to the copper plate.
These two techniques have really helped improve our setup time and accuracy.

I am so jealous of all your toys.
Simple and easy; Always the best way to do it. Very cool.
Hi,
I really like what you’ve done with your USB microscope and Z axis zeroing device. I’ve been struggling with zeroing my CNC machine for a while now. Can you share the macro code with us please?!?!
Lukas: I don’t have it right in front of me, but next time I’m in the workshop I’ll snag the macro code and post it here.
I purchased this USB microscope from AdaFruit. CD had only a chinese user manual. I did not see any crosshairs option in the software. Did you use the amcap.exe software on the CD, or a different program?
Hutch: On the version of amcap.exe that I have, the crosshair option is turned on/off under the “Window” menu option. As I recall, I did not use the CD. I downloaded it from the developer’s site.
Lukas: Here is my macro code:
Be sure to test and check this code thoroughly before you trust it. Also, go through each line and make sure you understand it so that it applies to your machine and situation:
Message(“Auto Zeroing program….”)
If IsSuchSignal(22)Then
code “G31 Z-3 F10”
While IsMoving()
Wend
Call SetDRO(2,.062)
Message(“Z-zero set. Moving to 0.125”)
code “G1 Z0.125 F20”
Message(“Auto Tool Zero Program Complete”)
End If
How did you ensure that the microscope axis is aligned with the spindle axis? If the axes are skew won’t you have a different offset depending on how high off the material the scope is when you zero the x and y?
Guido: You can use a digital level and/or a machinist’s level to make sure that the camera is mounted vertical with respect to the spindle axis.
Actually the proper way to do it is by using a mirror at the bed. Lower the spindle to get the camera as close as possible to the mirror and centre the cross hair to the reflection of the lens. Initially I thought that aligning the barrel of the camera to the spindle, will do the trick. But the camera it self is not always aligned. Mine for instance had a pretty big angle after doing the alignment with the mirror. But the cross hair is dead centre all the way from top to bottom of the Z axis.
why don’t you just probe the sides like you did with the z and subtract the radius of the bit
sorry add the radius of the bit
Amjad: Yes, that’s another good way of doing it. We have been using X-Y-Z probe method recently and we like that approach, too.
Hi, first i must say that i love your work, very inspiring.
Then i was wondering how you did an accurate measurement of the offset distance between the camera crosshairs and the spindle position
Thanks
Lars: Thank you, I really appreciate it. I put a tiny sharp tool in the spindle, made a little mark in aluminum, and set the CNCs digital read out to zero, then I jogged the CNC so that the camera crosshairs were in the center of the dot. Then I read the x and y distance off the digital read out. The offset would be the negative of that. I was as careful as I could be with it, because I knew I only had to do it once. —Camille
I really like the microscope camera setup. I assume the target reticule is from the amcap software.
I did a search on amcap.exe and found that people have been having issues with viruses in the download. I suspect that they came from the people peddling the download option when they add all of the other goodies that you really don’t want and have problems getting rid of. It have happened to me.
Can you provide a direct email address for the author? I have no problem with paying, but even with PC backups, I try to avoid the type of baggage that comes with a lot of software downloads.
I have a CNC Piranha. It had the metal touch pad as an option.
As a side issue, The Piranha has a router as a drive motor. Is 10,000 rpm a suitable speed for a 1/8″ bit and a reduced feed depth and speed for cutting aluminum? Do you use an aluminum cutting fluid?
The only issue besides router speed that I see is airborne particles being injested into the armature/brush area ( not sealed). I have to either force feed clean air or filter the air incoming.
Comments??
Camille: Yes, 10,000 rpm is OK for 1/8″ bit cutting aluminum. I’ve used 24,000 and I’ve used 6,000. Yes, I use cutting fluid or coolant when cutting aluminum. I don’t have a direct email address for the author of the amcap software.
Thank you for the help.
For those who saw the question about how to turn on the crosshairs, here is some clarification. The version ( look in HELP on the amcap.exe program) that came with the microscope camera was 9.03. The current version when you either demo or buy it is 9.21 or later . The crosshair was added in between and has a crossshairs option under window.
Hi Camille, is it possible to follow the same idea to make Z-zero for Endmills less than 0.5mm because endmills less than 0.5mm can easily break when it is in contact with any substrate(end mill in 0 rpm).
Karthik: I have not tested it on an end mill that small, but yes, I do believe it will work. The machine seems to stop instantaneously.
Hi
Good idea and I’m pretty sure you can expand on this. In fact I’m trying to achieve similar on my current project – digital label die cutter.
These guys offer a brilliant solution and I’m sure it could work in Mach3.
http://www.cnccamera.nl/src-gen/contact.html
Auto alignment is used in various applications. The auto scan and adjust cutter position feature would simplify the process, especially on repetitive part cutting.
Hello again
Could you also share the “Ref All Home” code please?
Anther way to check the ‘plumb’ of your camera would be to set your tiny mark, align the camera on it with as small a Z as you can get, retract the Z and see if it stays aligned.
It might be better to incorporate some XY adjustment screws in your camera bracket to allow for adjustments. And be sure to recheck your work after your alignment.
Is there any way to set X only, and Y only when you have a rounded corner in your material stock?
great work!
First of all, congratulation for your website, but more specifically to what you achieved!
I am pretty new to the CNC world, and I have been reading your articles to learn and slowly fill the tones of holes I have in my understanding of this world…
I particularly liked the USB microscope, which made me order one, thinking that I would figured out the macro part once I got the microscope…
Thing is, I am quick stuck at that point…
I am running Mach4 (As I started a few months ago, it seemed more logical than using Mach 3, not so sure anymore…) and if I understand correctly, the language for macros is different (Lua language)… There is a way less informations about Mach 4 compare to Mach 3, so I am quite frustrated now, not finding where I should start to be able to use my microscope…
So, I was wondering if by any chance you know about Mach 4 (as this post is about 3 years old, I though might by using Mach4 now) and could give me some hint about how to deal with those macro and set up something so I can use my microscope…
Any help would be very precious…
Thanks in advance, and congrats again for your work!